BLUEBERRY PICKIN’ TIME

One of my favorite times of the year … blueberry pickin’ time!  I love blueberries … doesn’t everyone!  When my children were very young, each summer we’d each gather whatever plastic buckets or tin cans we could find and climb the hills near our home.  All along the trails grew wild blueberries.  Wild blueberries, unlike cultivated blueberries, are much smaller and can be a challenge to pick.  Small and sweet, we’d eat as many as landed in the buckets, puckering up when we got a sour one.  And, of course, the competition was on to see who could pick the most.  Once home, I’d make blueberry pancakes, blueberry syrup and, of course, blueberry muffins.

Well, the only one doing blueberry picking now is me.  But that’s ok … it’s still an annual tradition.  My recipe collection has grown from just pancakes and muffins, but I have to admit, they are still my favorites.  Today, in addition to the big pot of blueberries gurgling away on the stove for jam, I’m making a Blueberry Galette.  A Galette is a fancy name for a free-form French tart.  In Italy, it’s called a Crostada.  Same recipe … different name.  And, honestly, nothing could be easier.

For the crust, you can take the time to make a classic pie crust, but if you want an easier solution, buy a package of pie crusts from the grocery store, or use frozen puff pastry … which is what I’m using.  And, if you don’t have blueberries, you could substitute just about any fruit … apples, strawberries, peaches, plums.

BLUEBERRY GALETTE
Bake at 400º – 30 minutes – serves 4 to 6

1 sheet puff pastry – thawed
3 cups fresh blueberries
3 teaspoons cornstarch
1/2 cup sugar
1/2 teaspoon salt
zest of one lemon
1 teaspoon lemon juice
1 egg – beaten
Turbinado sugar
1 pat butter

I am all about ‘mis ‘en place’ which is French for ‘putting in place’.  All my ingredients are assembled, prepped and ready to go before I even preheat the oven.  Mis ‘en place is a good discipline which I try to apply to every project I start.  So, with all the ingredients prepped … preheat the oven to 400º.

In a small bowl, mix together the cornstarch, sugar, salt, zest and juice of a lemon.  Pour over the blueberries and let sit while you prep the pastry.

On a lightly floured board, smooth out the pastry.  Make sure there are no cracks or the filling will ooze out and make a sticky mess.  The classic galette is round, but I’m not wasting any of this pastry, so I am making a rectangular one.  Place the pastry on a parchment lined baking sheet.

Leaving an inch or so around the perimeter, pile the blueberry mixture into the center.  Fold up the edges over the dough, pleating and pinching where necessary.  Again, do not give the blueberries a place to escape.
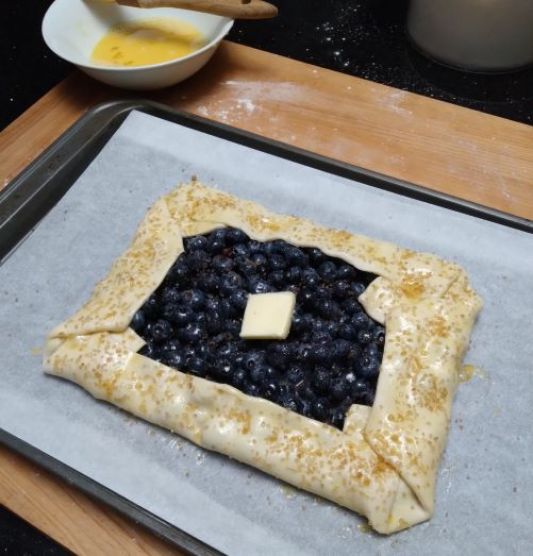
Brush the beaten egg over the edges.  Sprinkle with Turbinado sugar (or plain sugar).  I like the large crystals of the Turbinado sugar.  It adds a bit of crunch.  Place a pat of butter in the center.  Bake in a hot oven for approximately 30 minutes.  The crust should be nicely browned and the filling bubbly and hot.

Let the galette cool for at least 15 minutes when you take it from the oven.  I know you’ll want to dive right into it, but its worth the wait.  Meanwhile, whip up some heavy cream or get the ice cream out of the freezer.  This is soooooooo good!!

Side note:  the blueberry jam is ready and its to die for!

_____________________________________________________________________________

WHITBY FISH PIE

Whitby is a charming, seaside village in north Yorkshire.  Although we have visited quite a few times, there’s no real reason for most people to have heard of Whitby … unless you’ve followed the career of Captain Cook or have read Bram Stoker’s novel DRACULA.  Actually, quite a few literary geniuses have lived or visited Whitby during their careers.  In addition to Bram Stoker, you may have heard of Charles Dickens, Elizabeth Gaskell or Lewis Carroll among many others.  Today, tourism is what keeps this quiet, little fishing village alive … well, that and “fish pie”.

As with most regional recipes, it comes down to whatever is available, and whatever the cook decides to do with it.  In Whitby, it’s the ‘catch of the day’.  For me, it was a quick trip to the grocery store, after which I decided to use cod.  And pulling from my bookshelf of resources, it was Paul Hollywood’s BRITISH BAKING which inspired this beloved regional dish.

I was a bit hesitant … not all of my attempts at Hollywood’s recipes have been successful … but this one certainly was.  We all loved it.  A hearty, satisfying dish, flavorful and delicious.  Perfect for a Sunday supper on a wintry night.  Serve it up with a tossed green salad and bottle of white wine.  We hope you enjoy it as much as we did.

WHITBY FISH PIE
Serves 6 to 8.  Bake at 425º for 30 to 40 mins.

The crust (or purchase a pre-made pastry crust)
2 cups all purpose flour
1/2 teaspoon salt
10 tablespoons cold butter, cubed
1 egg, beaten
1/4 cup icy cold water

The filling
4 tablespoons butter
1/2 cup all purpose flour
2 cups milk
1/4 teaspoon ground cloves
1/2 teaspoon salt
pepper
1/2 diced white onion
2 stalked celery, diced
2 cups spinach, washed and chopped
1/4 cup parsley, chopped
2 lbs. solid white fish, skinned, cubed
2 boiled potatoes, peeled and cubed (optional)
1 egg, beaten

I know after reading this list of ingredients, it seems like a lot of time and work, but it really isn’t.  We all know a good pie starts with a good crust.  They are super easy, but if you don’t feel comfortable making one, store bought crusts have come a long way.

When ready to cook, make the filling in one large saucepan, beginning with a roux, adding leftover cooked potatoes if you have them.  Dump it all into a large pie plate or casserole.  Then top it with the pie crust and bake for about 40 minutes.  Done!
____
The details:
To make the crust:
Mix the flour and salt together in a bowl.  Add the chilled butter and cut in until the flour resembles coarse crumbs.  Add the beaten egg and, with a fork, mix together quickly adding the cold water as needed …

OR … put all the dry ingredients in your food processor and pulse for 10 seconds.  Add the cubed butter and pulse for another 10 seconds.  Add the beaten egg and as much water as needed to hold it together and pulse for a final 10 seconds.

The flour mixture should stay together.

Whichever method you use, when it comes together, turn out on a floured board and form a ball.  Wrap in plastic wrap and chill for at least 30 minutes.

The filling:
In a large saucepan, over medium heat, melt the butter.  When melted, stir in the 1/2 cup of flour and cook til all combined.  Slowly add the milk and whisk until smooth and creamy.  This will take two to three minutes.  Season with cloves, salt and pepper.

The bechamel should be nicely thickened.

Next, stir in the diced onions and celery.  The heat should be medium to low.  Then add the chopped spinach and parsley.  Taste to adjust the seasoning.  You may need to add a bit more salt.

Add the cubed fish and fold in gently.  You don’t want to break the fish up.  If you have leftover boiled potatoes, add them now … or any leftover veggies you may have.  Turn off the heat and dump everything into a large casserole or pie plate.

Take the pastry out of the frig and, on a lightly floured board, roll it out to fit the casserole or pie plate.  Be sure to cut an air hole in the center of the pastry for the steam to escape.

Brush the edges of the casserole with water or the beaten egg and put the pastry crust on top.    Press the pastry onto the rim of the dish to adhere.  Decorate as you’d like, or not.  Brush the beaten egg all over the pastry crust.

Be sure to put the casserole onto a baking tray to catch any spillage … and there will be spillage.  Bake at 425º for 40 to 45 minutes until golden brown and bubbly.


Take it out of the oven and serve right away.  A simple green salad and glass of white wine … maybe some crusty bread, perfect!  This is an old-fashioned supper dish and it doesn’t disappoint.  WHITBY FISH PIE … a steaming pie full of goodness and nutrition.  If you make it, please let me know.
~ ~ ~ ~ ~
References:  Wikipedia, Visit Whitby, Paul Hollywood,

ZUCCHINI TOMATO GALETTE

What’s better than being able to go out into the vegetable garden and pick whatever veggies you want for dinner that evening.  Again this summer, my garden has produced an over-abundance of zucchini.  In addition to making all my favorite zucchini recipes – muffins, chocolate zucchini bread, mock apple streudel, ratatouille, fritters and frittata – as well as filling the freezer –  I’ve been on the search for yummy, new zucchini recipes.  Well, I’ve come upon one which is so easy and delicious, I just had to share.  I made this once to test it and now I can’t stop making it.

I know “galette” sounds intimidating, but believe me, it’s not.  Whether you call these rustic, free-form pies a “galette”, “clafoutis”, or “crostada”, they are all easy to make.  And, you can make them savory or sweet – just vary the filling.  Keep in mind the term “rustic”.  It’s not suppose to be a perfectly-formed crust.  If you are fortunate enough to have a food processor to make the crust, its even easier.  And, the crust can be made up to three days ahead.

For a casual dinner or to impress guests, this is an easy-to-make, rustic Zucchini Tomato Galette.

ZUCCHINI TOMATO GALETTE
Bake 425°F for approximately 25 minutes.  Serves from 4 to 14 – depending upon serving size.  Will make one large or four individual galettes.

CRUST
1-1/2 cups all-purpose flour
1/2 teaspoon salt
1/2 cup (one stick) very cold butter, cubed
4 to 6 tablespoons ice water

The crust will be flakier if the butter and water are icy cold.  Mix the flour and salt together.  Then cut in the cubed butter until its a nice crumb.  If using the food processor, pulse 8 or 9 times.  Add just enough ice water to form a dough.  Dump the dough batter onto a lightly floured board.  Pat it together to form a smooth disk.  Wrap in plastic wrap and chill for about 30 minutes (or up to three days).

FILLING
1 large zucchini, sliced approx. 1/4″ thick
12 to 16 cherry/grape tomatoes, halved
3/4 cup ricotta cheese
2 eggs – 1 for egg wash
1/2 cup grated Parmesan/Romano cheese
grated zest of one lemon
salt and pepper
olive oil

On a baking sheet, spread the zucchini and tomatoes in a single  layer.  Brush lightly with olive oil, and sprinkle with salt and pepper.  Roast at 425°F for about 15 minutes or until roasted through.  When tender, remove and let cool.

While the veggies are roasting, mix together the ricotta cheese, one egg and lemon zest.  On a lightly floured board, roll out the dough to a large circle – approximately 14″ in diameter, 1/4″ thick.  Or, make individual galettes.  It’s entirely up to you.

Put the crust(s) on a large baking sheet.  Spread the crust with the ricotta and egg mixture, leaving a 2″ border around the edge.  Then sprinkle half the grated cheese onto the ricotta mixture.

Arrange the roasted zucchini slices and tomato halves on top of the cheese mixture.  Fold the edges of the crust over towards the center.  Brush the dough with the egg wash.   Sprinkle with the rest of the grated cheese.

Bake the galette in a preheated 425°F oven for 25 to 30 minutes, or until the crust is golden brown.  Remove from the oven and let cool for 15 minutes before serving.  Slice in wedges as if its a pizza.


For dinner, serve this delicious entree with a big garden salad.  Or, if you are having a party, this makes a wonderful appetizer, just slice in slivers and arrange on a platter.  This recipe is a  definite keeper.  I hope you enjoy it as much as we do.
____________________________________________________________________________


CHICKEN “POT” PIE WITH ROASTED VEG

I wonder why Americans add “pot” in the name of a meat pie. In the U.K. this is a “chicken pie with roasted veg”, but here in the states, it is a “chicken pot pie”. It doesn’t really matter to me what it is called, as long as its delicious … which this pie is!

Pot pies or pies in a pastry crust seem to have gone out of fashion. You can’t beat them, however, when the weather is as cold and gloomy as it has been and you need something hearty and comforting. They’re also a great way to use up whatever leftovers you may have in the frig. If you want a real time saver, you can buy pre-made pie dough at the grocery store, and along with a rotisserie chicken and a package of frozen vegetables (all of which I’ve done before), just assemble and bake.

Not today though. The chicken is going to be marinated and the vegetables are going to be roasted, which gives this pie a whole new dimension and depth of flavor. Although this is a ‘from scratch’ recipe, all of it can be done ahead of time … make the dough one day (up to three days in advance) … the vegetables another … and the chicken another. But it’s a very wintry day, and I’m in the mood to bake.

CHICKEN AND ROASTED VEG PIE
Preheated oven – 400°F. Roasting time – 20 to 30 mins. Baking time – 30 mins.

2 to 3 lbs. skinless chicken (breast, leg, thigh or combination)
Pie Crust for 2 9” pies
Marinade:
1/4 cup white wine or chicken broth
2 tablespoons balsamic vinegar
1 tablespoon fresh sage, chopped
1 tablespoon fresh rosemary, chopped  
1 teaspoon salt
1 teaspoon pepper
2 cloves garlic, minced
Stock:
1 cup chicken stock
1/2 cup white wine or water
2 teaspoons cornstarch + 2 tablespoons water = slurry
1/2 cup cream
Vegetables:
6 cups vegetables – cut in chunky pieces
– carrots
– sweet potatoes
– onions
– bell peppers, red and/or green
– mushrooms
(or any combination – Brussel sprouts, parsnips, cauliflower, etc)
olive oil
salt and pepper
1 egg

Early in the day (or the day before) prepare the marinade.  Mix all in a bowl and set aside. Cut the chicken into cubes, about 2”.  Pour the marinade over the chicken, cover and refrigerate … at least two hours. When you are ready to assemble, preheat the oven to 400°F.

Peel and cut the vegetables into chunky pieces. Put them into a bowl and drizzle with olive oil, season with salt and pepper. Spread the veg on a roasting pan and roast for about 30 to 40 minutes until tender and browned. After they are beautifully charred, let them cool and, if too big, cut into bite-sized pieces.

While the vegetables are roasting, heat olive oil in a large saute pan. Remove the chicken pieces from the marinade with a slotted spoon and brown in the hot pan. Don’t fuss with them, let them brown – 3 to 4 minutes. Then add the chicken stock, the remaining marinade and bring to a boil. Meanwhile make a slurry with the cornstarch and water.  After the chicken mixture has reached a boil, add the cornstarch slurry to thicken and make a gravy.  When it has thickened, take it off the heat and add the cream.  (I said this was hearty …  not lo-cal.) Taste for seasoning.

Add the vegetables to the chicken mixture and stir to combine.  Again, check for seasoning. The liquid may have thinned. If it’s too runny, add more of the slurry to thicken it.

Spoon the chicken and vegetable filling into pie plates … one very large pie plate or casserole, two 8″ pie plates, or many individual ones.

Roll out the pastry dough. Not too thin. Cover the mixture with the pie crust. Press down slightly and seal the edges. Brush with a beaten egg and then cut little slits in the crust for the steam to escape. It’s always fun to decorate with the scraps of pie dough (which, you can see, I did.)

I made one large 9″ and two smaller, single serving pies, which are going into the freezer to be baked and enjoyed another day. Bake in a preheated oven at 375°F for 40 to 45 minutes or until golden brown and the filling is piping hot.

Serve immediately with a nice crisp salad and glass of wine. So delicious. So comforting. So good!

I hope you enjoy this comforting meal as much as we did.
_____________________________________________________________________________

CUSTARD APPLE PIE

We did not go apple picking this year.  I’m not sure why.  It’s not as if every weekend was so busy we didn’t have time.  Nonetheless, my frig is stocked with apples.  How can anyone pass up those “tote bags” from local orchards in the produce aisle at the grocery store!  Not only are apples delicious and nutritious, they are soooo versatile, and this time of year, very affordable.

This is one of my ‘go to’ recipes.  Hopefully, you’ll like it as much as we do.  Don’t want to make pie crust … don’t worry.  Store bought pie crust is a great time saver.  If you want an easy recipe, my pastry recipe is at the bottom of this post …

CUSTARD APPLE PIE
Makes one family-sized pie, or two or more tarts (depending upon size).  Bake 350°.

1 recipe pie crust (store bought or see bottom)
1/4 cup butter
3 apples, Granny Smith are best, sliced (peeling is optional)
1/2 cup sugar
1/2 teaspoon cinnamon

1/4 cup butter, softened
3/4 cup sugar
4 eggs, room temperature
3/4 cup milk
1 teaspoon vanilla
2 tablespoons flour

In a saute pan over medium heat, melt the butter and add the sugar and cinnamon.  Mix together and then add the sliced apples.  Cook until the apples are tender and the caramel has thickened … about 5 minutes.

Line the pie plate (or tart pans) with the pastry.  I like to use tart shells … just because they look so pretty.  Put the pastry-lined pan into the refrigerator to get really cold.

In a large bowl, beat together the butter and sugar.  Add the eggs, one at a time.  Add the milk and vanilla.  When all is blended well, add in the flour and continue to beat until smooth.

Take the pastry out of the refrigerator and place it on a baking tray.  Then arrange the sauteed apples with the caramel sauce on the bottom of the pie.  Leave a few apples out for decorating the top.  Put the baking tray in the oven before pouring in the custard.  This will help avoid spillage.

Pour the custard on top of the apples.  Bake at 350° for about 40 to 50 minutes until set (but still a little jiggly in the center).  The pastry should be browned and a slight browning on the custard.

Remove from oven and arrange the saved apples on top.  Drizzle with the caramel.  Let cool completely before serving.  Flaky crust, creamy custard and cinnamon apple goodness … what more could you want this time of year?  Now go ahead, put the kettle on, and wait for all the compliments!!

~ ~ ~ ~ ~

Pastry
1-1/2 cups flour
pinch salt
1 stick ice cold butter, cut in pieces
3-4 tablespoons ice cold water
1 tsp lemon juice

I use a food processor to make pastry which makes it so-o-o easy.  To the flour/salt cut in the ice cold butter til crumbly.  Don’t overwork it.  You should be able to see chunks of butter.  Quickly add the ice water/lemon juice til dough comes together.  Dump the dough onto a lightly floured board and knead quickly into a smooth ball.  Wrap in plastic wrap and refrigerate at least 15 minutes, or up to three days.  The colder the butter, the flakier the crust.
_____________________________________________________________________________

Chicken and Leek Pie

This classic Welsh “pie” is served on March 1st which is St. David’s Day.  St. David’s Day celebrates Wales’ patron saint with celebrations all across the U.K.  Born in the 6th century, Fr. David was heavily involved in missionary work and founded a number of monasteries.  As a strong leader and with a strict adherence to Christian beliefs, his loyal followers grew.  Fr. David was made Archbishop while on a pilgrimage to Jerusalem, and was consecrated a saint by Pope Callistus in 1120.  With more than 50 churches named after him, and the largest Cathedral in Wales, there is no doubt as to this man’s popularity.

I’m not sure why this particular dish is associated with St. David’s Day … could be because two of the key ingredients are practically national symbols of Wales (leeks and Caerphilly cheese). What I do know, however, is this is a fantastic family dish … and perfect for to be served on March 1st or any other day!

I have to admit I did not have Caerphilly cheese (and couldn’t find it), so I substituted Cheddar, but I think next time I’m going to use Stilton.  I also added sliced mushrooms for a little earthiness.  It was hearty, rich and delicious!  As they say in Britain, “why not have a go?”.

CHICKEN AND LEEK PIE
Bake at 425° F for 20 minutes … reduce heat to 350° F for 40 minutes.

4 large chicken breasts, or 8 chicken thighs (or any combination), cubed
4 tablespoons flour
1/2 teaspoon nutmeg
salt and pepper

2 tablespoons olive oil
4 cloves garlic, minced
2 cups leeks, washed and sliced
1 cup mushrooms, sliced
2 teaspoons Dijon mustard
1 cup chicken stock
1/2 cup white wine
1/2 cup heavy cream
1 cup crumbled Caerphilly cheese (or Feta, or Gouda or Cheddar)
1 tablespoon fresh parsley, chopped
1 tablespoon fresh tarragon, chopped
1 sheet frozen puff pastry
1 egg, beaten
salt and pepper


Cube the chicken pieces.  In a large plastic bag, add the flour, salt, pepper and nutmeg.

Put the chicken cubes into the flour bag and toss til the chicken is completely coated.

Into a large skillet heat the oil and sear the chicken.  Remove the chicken to a plate and add a bit  more olive oil to the pan.

Reduce the heat to medium and saute the leeks til soft (about 5-6 minutes).  Add the garlic.

Put the chicken back into the pan and add the mushrooms.

Turn up the heat and slowly add the chicken stock and the white wine.  Stir well to combine and reduce to thicken.

Then turn the heat to low and add the heavy cream, the mustard and the cheese.  Taste to adjust the seasoning.

Remove from the heat and add the fresh herbs.  Pour everything into a large heat-proof casserole dish.

On a floured board, roll th e puff pastry sheet out just a bit to fit over the top of the dish.  Brush the egg around the top of the dish for the pastry to adhere.

Place the pastry on top and cut slits into the top of the pastry for the steam to escape.  Brush the pastry with the beaten egg.

 Place the casserole onto a baking tray just in case you get seepage.

Pop the tray into a very hot oven 425°F for 20 minutes.  Reduce the temperature to 350°F and bake for an additional 30 to 40 minutes.


Serve piping hot with a side salad and glass of wine!  Now sit back and take all the complements!

~ ~ ~ ~ ~
References:  Catholics Online, Wikipedia, Encyclopedia.com,

Whoopie Pies?

Yes, I know … they have nothing to do with Great Britain.  Whoopie Pies are uniquely American, actually a New England creation.  And, being from New England, I just had a craving for a Whoopie Pie (not sure why).  What do you do when you want something and you just know that whatever you buy at the grocery store is not going to be as good as the ones you grew up with? Well, you get out the ingredients and make it yourself!  Couldn’t be easier.

This recipe is ‘borrowed’ from Martha Stewart.  Thank you, Martha.  It is rich, chocolaty, cakey and delicious.  I did not make a traditional marshmallow-fluff-type filling, but rather crunchy peanut butter.  Just felt the need to do something different.  Give this a try and let me know what you think.

WHOOPIE PIES with PEANUT BUTTER FILLING
Preheat the oven to 375°.
1-3/4 cups all purpose flour
3/4 cup unsweetened dark cocoa powder
1-1/2 tsp. baking soda
1/2 tsp. salt

4 tblsps. softened butter
1/4 cup vegetable oil
1/2 cup granulated sugar
1/2 cup dark brown sugar
1 large egg, room temperature
1 cup buttermilk
1 tsp. vanilla

I always gather all the ingredients and tools before cooking anything (with a cuppa, of course).  It just ensures that I have everything I need before starting.  Preheat the oven to 375° and grease two large baking sheets (or mold sheets).


In a mixing bowl beat together butter, shortening and sugars until light and fluffy (about 3 minutes).  While this is beating, in another bowl add the flour, cocoa powder, baking soda and salt.  Whisk well to mix and lighten.


To the butter and sugar mixture, add the egg, beat until light and fluffy.  Add half the flour mixture to this, blending well.  Then add the milk and vanilla.  Beat well.  Add the remaining flour.  Beat together, scraping down the sides of the bowl.


Using a rounded spoon or, as I like to use, an ice cream scoop, drop 24 equal rounds of dough onto a greased baking sheet.  If you have a whoopie pie mold, that works beautifully.


Bake the cookies in the center of the oven for 12 to 14 minutes (turning the pans halfway through the cooking time).  Do not overbake or they will be dry.  Less is more!

When baked, let cookies cool for a few minutes and then transfer to a baking rack.  While cooling, make the Peanut Butter Filling (or whatever filling you might like).


PEANUT BUTTER FILLING

3/4 cup natural peanut butter (smooth or crunchy)
1 stick softened butter
3/4 cup confectioners sugar
pinch salt (to taste)

Using an electric mixer beat the butter and peanut butter together til smooth.  Add the sugar and continue beating until light and fluffy, about 5 minutes.


Assemble the cookies by spreading (or piping) one tablespoon filling on the bottom of one cookie, then press the bottom of the same size cookie to it.  You can certainly be fancy and pipe the filling onto the cookie bottoms (although I was too anxious to pipe this time, I’ve piped the filling ever since.  It’s much neater and more professional looking).

Presto, you’ve made Whoopie Pies! Now all you need is a big glass of milk ….. or a big pot of tea!!

~ ~ ~ ~ ~ ~

References:  Martha Stewart

Toad in the Hole … my way!

For  hubby, this is comfort food to end all comfort foods!  Toad in the Hole … really?  Who am I to say what is comfort food.  For me, it’s Mac ‘n Cheese!  At least with Mac ‘n Cheese you have an idea of what it is. Toad in the Hole . Bubble ‘n Squeak . Jam Roly Poly . Spotted Dick . where do the Brits get these names?

The origins of Toad in the Hole, which are sausages baked in a Yorkshire Pudding (aka Popover) batter, generally served with onion gravy, are sketchy.  Some food historians theorize that this dish originated in the late 1600’s when a flour and egg batter (now known as Yorkshire Pudding) was placed under the meat while it was cooking on an open spit, in order to catch the drippings. Others say that “no, it wasn’t until the early 1800’s” that this type of batter was used.

Today this very economical dish is traditionally made with bangers (sausages).  But in The Modern Housewife by Alexis Soyer (1850), she suggests using “any remains of cooked beef, veal, mutton, pork, roasted or boiled, salt or fresh, game and fowl”.  As a result, you can see that this dish was probably not served to the aristocrats or royalty, but rather to the working class and poor. Dishes like this, however, are what we have all come to love.  Comfort food!

Where did the name come from?  No one is really certain.  Does the finished dish look like toads poking up out of a quagmire?  Was the dish originally made using toads or frogs?  Or was it named after a pub game of tossing discs into holes in a pub table?

All I know is, tonight I’m making Toad in the Hole – My Way!  Why am I calling it My Way? Because I think the original recipe is a little bland, so I am kicking it up just a bit with Harissa and adding onions coated in a mixture of Ketchup and Chili Sauce.  Like many family recipes, there are quite a few variations. Give this one a try and let me know what you think.

TOAD IN THE HOLE (my way)
1 cup all purpose flour
4 eggs, room temperature
1 cup milk (whole or 2%)
salt and pepper
1 tsp Harissa seasoning (or more to taste)
8 to 10 good quality pork sausages (sweet or spicy)
2 tablespoons ketchup
2 tablespoons sweet chili sauce
2 onions, sliced
olive oil
4 tablespoons sausage drippings

Make the batter first  and then set it aside for at least 30 minutes (up to 3 or 4 hours).

Into a bowl sift 1 cup flour, 1/2 teaspoon salt, pepper to taste and the Harissa seasoning.

Mix together and make a well in the center.  Add 4 eggs and beat well.

Add the milk while beating the mixture.  Be s ure to beat til smooth and lump free.  Set aside.


Preheat the oven to 400°.

In a saute pan, heat the olive oil over medium heat and brown the sausages.  I prefer spicy sausages, but you can use sweet, or flavoured.

When nicely browned put the sausages into an ovenproof baking dish (approx. 13″ x 9″).

In the same saute pan add a bit more olive oil and, over medium heat, saute the sliced onions. Season with salt and pepper. When they are soft (about 10 minutes) add the ketchup and sweet chili sauce, coating the onions well.  Pour this over the sausages in the baking dish.

If you do not have 4 tablespoons of drippings after cooking the sausages and onions, make up the difference with olive oil.  Add it to the baking dish and then put the baking dish into the 400° oven for 5 minutes until everything gets very hot.

Remove the dish from the oven and quickly pour the batter over the sausages and onions.  Pop the dish back into the oven and bake for 35 minutes.  Don’t peek!  You want the Yorkshire Pudding to puff up and if you are opening and closing the door, it will deflate.

When the pudding is golden brown, and still a bit soft in the middle, it is ready.  Serve immediately with a crisp green salad.  Hot, crisp and soft with a bit of heat from the Harissa … English comfort food!!

~ ~ ~ ~ ~
References:  BBC Food, The Telegraph, Britain Explorer,

Scotch Eggs …. the original Fast Food!

I’ve been to Scotland, but I never saw a Scotch Egg.  In fact, I’ve never eaten a Scotch Egg.  What are they?  You certainly don’t see them here in the States.  And in the U.K., for the most part, they had faded into obscurity …… until recently that is.   It seems this food item was for the longest time considered among the “worst foods in Great Britain”.

Most often you find Scotch Egg s in the convenience foods aisle of the supermarkets or in the take-away section of a roadside rest area.  Morrisons, Marks and Spencer and Waitrose all sell them as frozen foods ready to take home, throw in the microwave and enjoy (?) for afternoon tea.

But, wait a minute . . . Tesco has just introduced a new version of the Scotch Egg wrapped in pastry . . .  and this hand-held snack recently appeared on a foodie magazine’s list as one of the “cool” new foods . . . not to mention Chef Tom Kerridge who has a gourmet version of the Scotch Egg in his Michelin-starred restaurant.  Scotch Eggs are being wrapped in patés, in avocado, in Black Pudding.  There are Scotch Eggs using quail eggs, ginger, tumeric, Panko ….  Apparently, what is old is new again.

Fortnum & MasonSo where did the Scotch Egg come from?  The posh London department store, Fortnum & Mason, takes credit for inventing this snack in the 18th century as part of its portable luncheon for travelers. In the 18th century traveling was a long and arduous event for even the shortest distances.  If you got hungry, there were no fast food restaurants along the way.  MacDonalds, Burger King’s, Kentucky Fried Chicken,Taco Bell?  So what did you do when you did get hungry?  Hopefully, you planned ahead.

Dr. Andrea Tanner, Fortnum & Mason’s archivist says “From the very beginning of the business Fortnum’s used to produce ready-made dishes like pork pies for travelers, which were put in baskets with disposable bamboo cutlery. The Scotch egg was one of those foods. It was small enough to fit in a handkerchief or pocket, and maybe was rather less smelly than tucking into a hardboiled egg on a coach.”

If they were a convenient luncheon or snack item in the 18th century, then why not now?  They are easily transportable . . . perfect for tailgating parties, backyard cookouts or school lunches.  Low cal?  No!  High protein?  Absolutely!  How do they taste?  Let’s find out!

SCOTCH EGGS
Recipe adapted from Simon Rimmer’s “SOMETHING FOR THE WEEKEND”

5 large eggs  (soft, medium or hard boiled)
12 oz. sausage meat
fresh thyme – 1 tsp.
fresh parsley – 1 tblsp.
1/2 onion, minced
flour seasoned with salt and pepper
bread crumbs (or Panko)
1 egg, beaten
salt and pepper
vegetable oil for frying

 If you don’t know how to boil eggs, let’s start there.  Place 5 eggs in cold water.  Bring to a boil. Cover, turn off heat and let sit.  Depending upon how hard you want the yoke, it can be 4, 6, 8 minutes.  Remove the eggs with a slotted spoon, cool and shell under cold running water.

Prepare three dishes for coating the mixture:  an egg wash, seasoned flour, and breadcrumbs.


If you are using sausage in a casing, remove the casing.  In a bowl add sausage meat, thyme, parsley and minced onion.  Add salt and pepper.  Mix well.  Divide this mixture into five mounds (for five eggs).


In your hand take one mound of sausage and form a flattened round.  Place the cooked egg in the center and form the ball around it.  Do this for each egg.

Take the sausage wrapped egg and dip each one into the beaten egg wash, then the flour and finally the breadcrumbs, making sure they are completely covered.

Heat the vegetable oil to about 325.  Carefully place the eggs into the oil to cook.  It will take approximately 6 to 8 minutes per egg.  With slotted spoon remove the egg and place onto a paper towel to drain.   (You may need to finish the eggs in the oven – which is what I did.)

How were they?  If you love pork sausage, you’ll love these.  For me, they were dense and a bit heavy. They really are perfect for a portable lunch or snack.  Very filling and satisfying, I can’t imagine eating more than one (but hubby certainly can).  I think next time I’ll “oven fry” them and see if that lightens then up a bit.  Also I think I’m going to undercook the eggs so they are a bit softer and I’ll try chicken instead of pork sausage.   Hmmmm, I think we have may something!!


~ ~ ~ ~ ~

References:  BBC Food, The Guardian, Something for the Weekend, Fortnum & Mason

Cornish Pasties

Every time we visit England, the first stop my husband has to make is to a motorway rest area.  Yes, the very same ones that appear along highways and motorways everywhere …. except in England where they have a food truck in the parking lot selling authentic “Cornish Pasties”.    “One Cornish pastie and one cheese and onion pastie, please.”   We then go back to the car where he savors every last bite.   Knowing how much he enjoys these rustic hand pies, I have learned to make them.  They may not have the “terroir” of the ones in England, but they’re pretty darn good.

History of Cornish Pasties
A “pastie” is a pastry pie, most often filled with meat and/or veggies.  It is thought that pies  originated in England around the 1300s as a practical way to serve and preserve meats.  The better cuts of meat were, of course, used by the wealthy upper class, with the lower class reduced to using entrails and organ meats, known at that time as the “umbles” (from which we get the term “eating (h)umble pie, meant as an apology).  Now these “umbles” are referred to as “offal” and are quite the trend in gourmet dining.

During the Middle Ages the pies were highly spiced (in an attempt to cover up the rancid flavors, I’m assuming).  With no refrigeration, pie making took place on a Monday and they were expected to last the week, if not longer.  Eventually, pie making took place outside the home and the “pie man” became as important as the ‘butcher, the baker and the candlestick maker’.  Hopefully, I’m not the only one who remembers the nursery rhyme “Sing a song of six pence, a pocket full of rye, four and twenty blackbirds baked in a pie.  When the pie was opened, the birds began to sing, wasn’t that a dainty dish to set before the king?”

The pie quickly became popular as a method of providing a hearty meal to laborers who worked on the farms and in the mines.  A hearty pie could be transported easily, required no plates or utensils and would sustain a worker til he returned home at night.  Originally the hand pie was made with a savory meat filling at one end and a sweet fruit filling at the other.  Who doesn’t love a little dessert at the end of their meal?

miners eating pasties

The Cornish pastie is so revered, in 2011 it received protected status from the  European Commission.  You can buy pasties all around the U.K., but to buy a “Cornish pastie” the Commission requires it to be prepared in Cornwall, but it can be baked elsewhere.  Also, it must contain uncooked meat, potatoes, turnip, onion, salt and pepper (nothing more).  It must be in the shape of a “D” and be crimped along one side.  If it does not meet all these requirements, it can be a “pastie”, but not a “Cornish pastie“.

It appears even Hobbits enjoyed pasties in the Shire ….
Hobbitt pies 2

Classic Cornish Pastie Recipe
Like regional foods everywhere, every family has their own special touches.  The following is the classic recipe, which we love.  Feel free to add your own special touch as well.  You should get 8 to 10 servings, depending on the size of the rounds you cut from the pastry.  If you are going to prepare your own pastry, it does take a little extra time, but its so good.  Prepackaged pastry, however,  works just fine.

The Crust
All purpose flour – 2-1/4 cups
Salt – 1 teaspoon
Butter, cold, unsalted – 8 ozs., cut into cubes
Cold Water – 6 tablespoons or more
The Filling
Chuck steak – 10 ozs., cut into 1/4″ dice
Onion – 1 small, cut into 1/4″ dice
Potato – 1 medium, peeled and cut into 1/4″ dice
Parsnip – 1 medium, peeled and cut into 1/4″ dice
Salt – 1 teaspoon
Pepper – 1/2 teaspoon
Butter
Egg – 1 lightly beaten

Put the flour and salt into a large bowl (or food processor) and add the cold, cubed butter.  If you are using a food processor, pulse quickly til the butter is incorporated but still visible.  If using your fingers, or a pastry cutter, incorporate the butter only until the mixture looks like bread crumbs.  Add the cold water and mix with a fork quickly until a dough forms.  If more water is needed, don’t hesitate to add it, but a little is all you need.  Turn the dough out onto a floured board and knead briefly.  Wrap in plastic wrap and refrigerate.  You want the dough to stay as cold as possible to get that nice flaky crust.

Preheat the oven to 400 degrees F.  Place a rack in the center of the oven.  Prepare two large baking sheets with parchment paper.  While the oven is preheating, in a large bowl combine the diced meat, onion, potato and parsnip.  Add the seasonings and set aside.

On a floured board roll out the pa??????????????????????stry dough until it is 1/4″ thick.  I cut the dough in two pieces to make handling a bit easier.   Using a plate, or pot cover, or anything that will give you a 6″ diameter round (or larger, if you’d prefer), cut rounds out from the pastry dough.


Stack the rounds on a plate with waxed paper in between to prevent sticking.  Gather up the scraps and reroll them.  Don’t be wasteful.  You should have 8 to 10 6″ rounds.

???????????????????????????????


Using one pastry round at a time, place about 1/2 cup of filling to the side of the pastry.  Add a pat of butter onto the filling and then brush the beaten egg around the edges.  Fold the unfilled side over the filling and press down to seal.


Starting at one edge, crimp the edges to prevent leaking.  A traditional Cornish pastie has 21 crimps.  The most I could achieve was 14.  Oh well, more practice is needed!

Place the pasties on the baking sheets and brush with the remaining egg.  Cut two slits in the top of each pastie to allow steam to escape. 

Bake at 400 degrees for 20 minutes until the edges begin to brown.  Then reduce the temperature to 350 degrees and bake for 20 to 25 minutes more, or until golden.  Remove from the oven and cool for 10 minutes.   For lunch, a quick supper or snack, they are delicious.  Enjoy!!

 ???????????????????????????????

~ ~ ~ ~ ~
References: